
📌 Safety First (Important)
Before doing any electrical work:
✔ Turn OFF the circuit breaker that controls the switch you’re replacing.
✔ Use a voltage tester to confirm power is off.
✔ If you’re unsure about your wiring or local regulations, hire a qualified licensed electrician.
🧰 Tools & Materials You’ll Need
Screwdrivers (flat + Phillips)
Wire stripper/cutters
Voltage tester
Electrical tape
Wire connectors (wire nuts)
The smart switch you’re installing
🧠 Understanding the Wires
In a switch box you typically see:
Live (Line) wire – carries incoming power (often red/black)
Load wire – goes from switch to the light fixture
Neutral wire – returns unused power (often blue/white)
Ground wire – safety earth (green/bare)
For smart switches:
➡ Most smart switches require a neutral wire to power the switch module.
➡ Some no-neutral smart switches are designed to work without it.
🔌 1. Installing a Smart Switch With Neutral Wire
This is the most common scenario in modern homes.
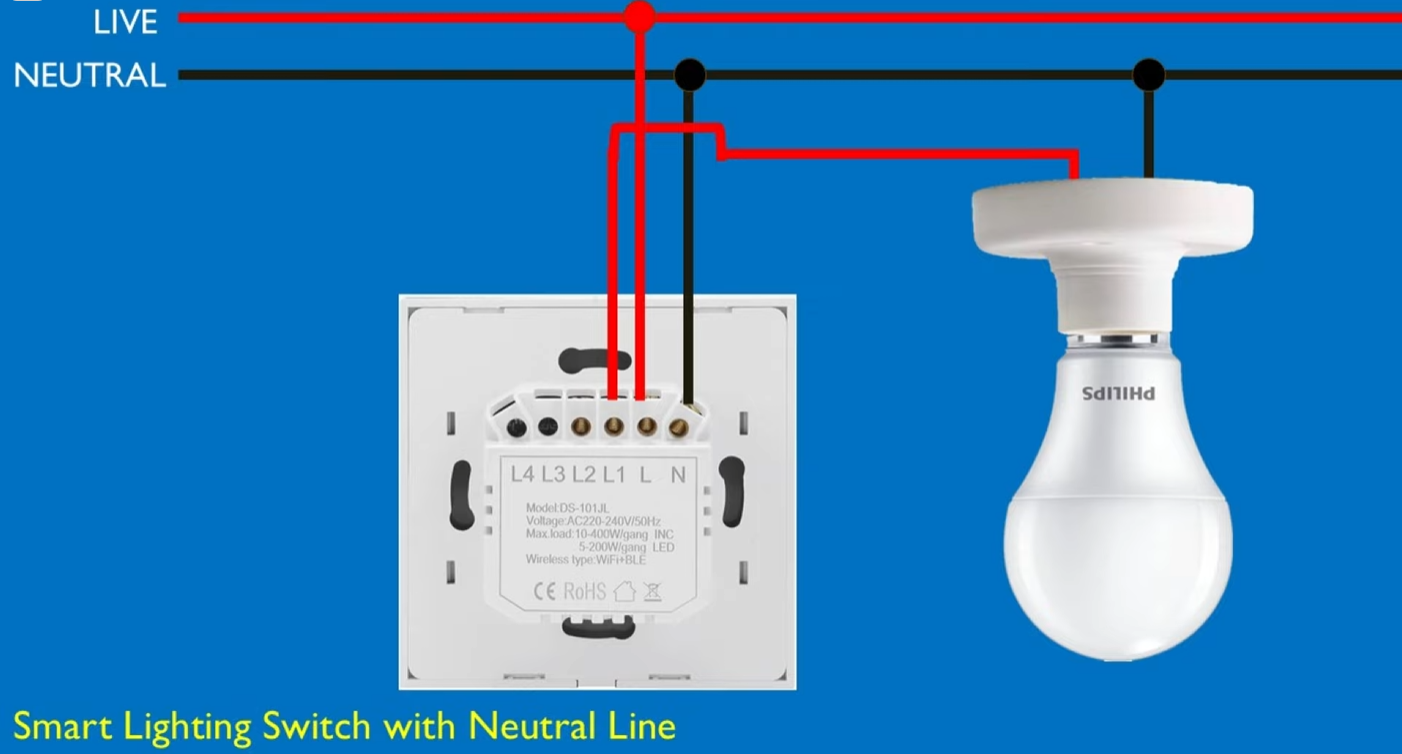
Step-by-Step
Wiring Steps
Power OFF at breaker
Remove old switch
Identify wires:
L (Live in)
L1 (Load to lamp)
N (Neutral bundle)
Earth
Connect smart switch:
L → Live
L1 → Load
N → Neutral
⏚ → Earth
Mount switch → Power ON → Test
✅ Smart switch powers itself directly from neutral
✅ No flicker
✅ No capacitor needed
✔ The neutral wire provides a complete power loop so the smart switch can stay powered even when the light is off.
⚡ 2. Installing a Smart Switch Without a Neutral Wire using a capacitor
Older homes often lack a neutral in the switch box — only live and load wires are present. A standard smart switch won’t work unless it’s specifically designed for no-neutral installation.
How No Neutral Smart Switches Work
Smart switches that support no neutral are engineered to draw just enough power through the line and load to power the smart module without a dedicated neutral return.
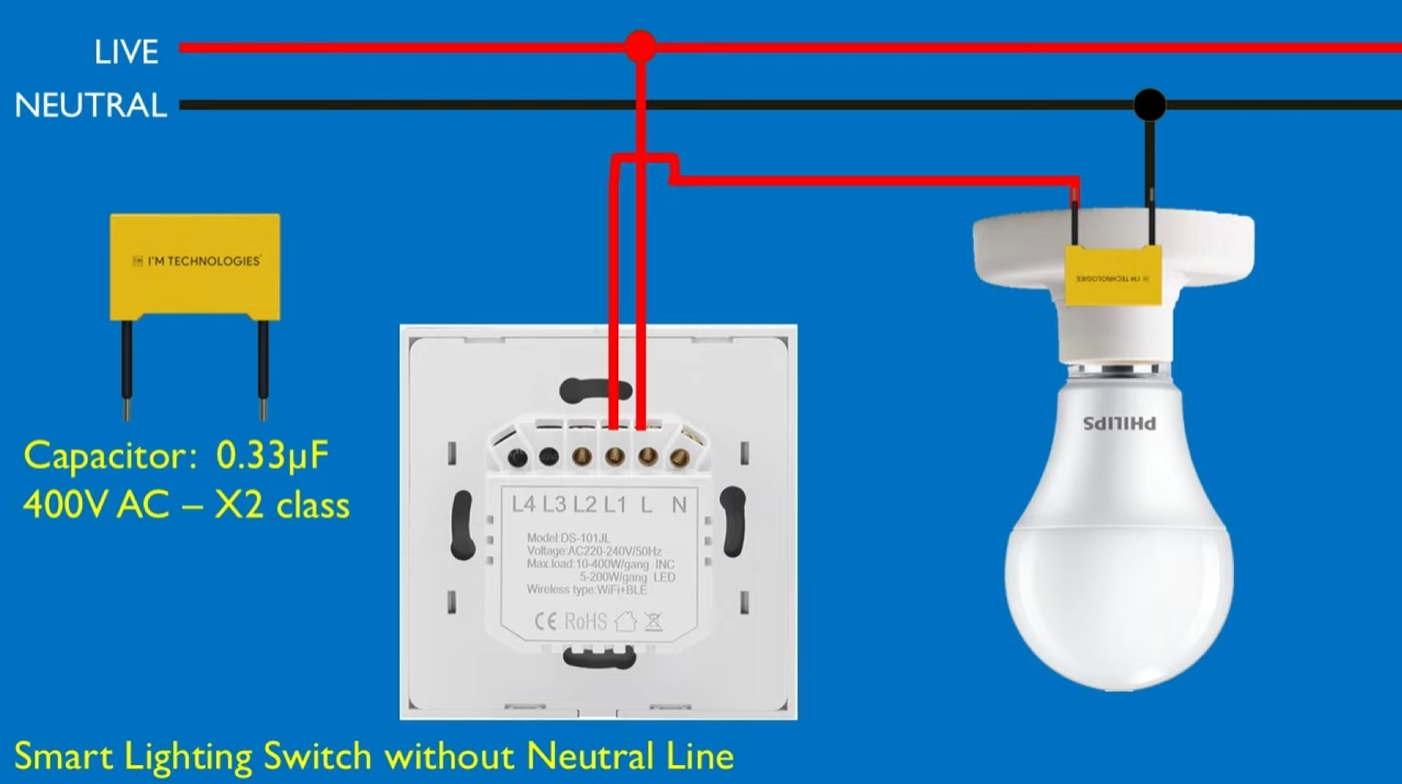
🔍 Why the capacitor is required
A no-neutral smart switch:
Steals a tiny current through the lamp
Without a capacitor → LED bulbs flicker or stay dim
Capacitor acts as a bypass, stabilizing the circuit
📦 Where the Capacitor Goes
NOT behind the switch
👉 At the light fitting (ceiling rose / junction box)
🔧 Wiring Steps (IMPORTANT)
Power OFF at breaker
Remove old switch
Step 1 — At the Switch
You will only have:
Live (L)
Load (L1)
Connect:
L → Live
L1 → Load
Earth if available
🚫 No neutral connection here
Step 2 — At the Light Fitting (CRITICAL PART)
Open the ceiling rose / light junction
Identify:
Live going to lamp
Neutral going to lamp
Connect the capacitor IN PARALLEL with the lamp:
One capacitor wire → Live
Other capacitor wire → Neutral
👉 The capacitor sits across the lamp terminals, NOT in series

✔ This allows the smart switch to stay powered
✔ Prevents lamp glowing when OFF
❗ Very Important Rules
❌ Never install capacitor at the switch
❌ Never connect capacitor between Live & Earth
❌ Never skip capacitor with LED bulbs
✅ Always use the capacitor supplied with the switch
🧪 Final Testing
Power ON breaker
Test:
Physical ON/OFF
App control
Light OFF = fully OFF (no glow)
If flicker exists → recheck capacitor connections
🛠 Common Problems & Fixes
| Problem | Cause | Fix |
|---|---|---|
| LED flickers | Capacitor missing | Install capacitor |
| Light stays dim when OFF | Wrong capacitor placement | Move to lamp |
| Switch dead | Wrong Live wire | Swap L / L1 |
| Buzzing | Poor connection | Tighten terminals |